Using plug-in for WordPress CMS
Overview
- the WordPress CMS version is 6.2 or later,
- the WooCommerce plug-in version is 8.2 or later,
- the PHP language version is 7.4 or later.
The Flashpay Payments plug-in is installed via the WordPress interface and allows opening the Payment Page payment form of Flashpay for customers and ensuring all necessary actions for payment processing with regard to the interaction with both customers and the Flashpay payment platform (with all necessary information sent and received).
General information
Capabilities
With the Flashpay Payments plug-in, the following is available:
- Setting up the capability to open the Payment Page payment form of Flashpay in the web service on the fly.
For this, you only need to take a few actions in the interface of the WordPress CMS.
- Testing the operation of the payment form and the capabilities of payment processing.
For this, you can get a test project in the Flashpay payment platform (by submitting an application on the company's main site) and use the identifier and secret key of this project.
- Processing one-time one-step or two-step purchases.
- Registering and processing COF purchases (subscriptions)—if the web service has the WooCommerce Subscriptions extension installed.
For this, you can manage the properties of such purchases (such as the payment amount and schedule, free trial period), inform customers about subscription related events, and combine different purchases into a single order.
- Issuing partial and full refunds for purchases, which were processed with the help of the plug-in.
For this, you can use the WordPress interface and if relevant—the Gate API and Dashboard interfaces of the Flashpay payment platform.
- Monitoring the information about payments, which were processed with the help of the plug-in.
For this, you can use the WordPress interface and if relevant—the Dashboard interface from Flashpay, with the information in these interfaces synchronised (except for the cases when the refunds were made via Gate or Dashboard; in such cases, the payment statuses may not be updated in the WordPress interface).
- Managing orders with related purchases processed with the help of the plug-in—via the WordPress interface.
This includes cancelling and deleting these orders and changing their statuses manually (if necessary).
- Configuring the parameters of the Payment Page operation and adjusting the form to the web service specifics, as well as using various capabilities provided by Flashpay.
- Using various capabilities provided by the developers of the WooCommerce plug-in.
Particularly, you can set up the usage of this plug-in (and the connected Flashpay Payments plug-in) in different countries (details).
This range of capabilities allows you to adjust to various business specifics, flexibly configure user scenarios, and ensure a high rate of the payment form conversion and payment acceptance. For setting up and using the capabilities provided by Flashpay, refer to the technical documentation on this portal and, if necessary, contact the Flashpay specialists. With questions about using various capabilities for the WooCommerce plug-in, refer to the documentation on the corresponding portal.
Workflow
The following diagram illustrates the workflow of executing purchases with the use of the Flashpay Payments plug-in. The workflow involves the customer, the merchant's web service with the built-in WooCommerce and Flashpay Payments plug-ins, the Payment Page payment form, the payment platform, and the payment environment. On the web service side, the opening of Payment Page is requested and automatic interaction with the payment platform is carried out in accordance with the plug-in parameters.

- On the web service side, the customer opens the checkout page of the WooCommerce interface.
- The request for opening the Payment Page payment form is automatically generated and sent to the payment platform via the plug-in.
- The request for opening Payment Page is received in the payment platform.
- The request is processed in the payment platform and checked for correctness.
- The necessary actions are performed on the payment platform side to prepare either for displaying the payment form or for redirecting the customer to a third-party service, in accordance with the parameters for opening the payment form.
- The payment form is displayed to the customer or the customer is redirected to a third-party service.
- The customer completes the required actions for purchase and confirms the purchase.
- The final purchase request (with all necessary data) is received in the platform. In case of redirecting the customer to a third-party service, the final request can be received at step 5.
- The request is sent to the payment environment.
- The request is processed in the payment environment. And if necessary, additional actions are performed on the side of the platform and the customer (for example, for the 3‑D Secure authentication).
- The purchase result information is sent from the payment environment to the payment platform.
- The callback with the purchase result information is sent from the payment platform to the web service. The callback is automatically processed with the help of the plug-in, thus the payment information is updated in the WordPress interface.
- The purchase result information is sent from the payment platform to Payment Page.
- The purchase result information is displayed to the customer: in the merchant's web service, on the page with the information about the paid order of the WooCommerce interface, (in the general case) or in the Payment Page payment form (in case if the capability of payment retries is set up).
Usually, in case of working with the Flashpay
Payments plug-in, an order is created after the customer proceeds to a purchase from the checkout page and before they confirm this purchase. In this case, the payment identifier consists of the number of the order and the number of the attempt to pay for this order in the web service (for example, the identifier can be 123_2 if the customer made two attempts to pay for order number123). Along with that, if the capability of payment retries is set up, the final digit of the payment identifier always equals to one, since all payment retries are made within one payment (for example, the identifier can be 123_1 even if the customer made at least two attempts to pay for the order).
If the Payment Page payment form is opened in the iframe element, the order is created only after the customer confirms the purchase. In this case, the payment identifier consists of the wp_ prefix and an arbitrary sequence of ten characters (for example, wp_ert12h2t1o), without the number of order and the number of the attempt to pay for this order included. Along with that, the capability of payment retries is not supported for this option of opening the payment form, all purchase attempts are made with the payment form reopened.
The purchases that are processed according to the provided workflow via the Flashpay payment platform are assigned the statuses used by Flashpay (details), while the orders created on the web service side are assigned the statuses used by WooCommerce (details). You can monitor the information about these payments and statuses in the sections of the WordPress interface: Orders (for one-time purchases) and Subscriptions (for COF purchases). With questions about the statuses of payments and orders, address the Flashpay account manager.
Installation
General information
To start using the Flashpay Payments plug-in, you need to install it. Along with that, if an earlier version of this plug-in was previously used, it is recommended to deactivate this version before installing the new one (you can do it through the list of installed plug-ins in the WordPress interface). There are two ways to install the plug-in in the WordPress interface—via the plug-ins directory of WordPress (without prior download of the plug-in file) or via the plug-ins upload function in the WordPress interface (with the plug-in file downloaded beforehand). The plug-in file can be downloaded from the directory or from GitHub.
Installation via the plug-ins directory
To install the plug-in via the directory, go to the WordPress interface and proceed as follows:
- Select the Plugins section in the navigation menu and the Add New Plugin item in the menu that appears.
- Search for the Flashpay
Payments plug-in from Flashpay using the search box on the page that opens.
For this, use the search box on the right side of the page and ensure that the plug-in in the search results is provided by Flashpay (this is stated on the plug-in panel).
- Click the Install now button (or the Update Now button if an earlier plug-in version was used) on the panel and wait for the installation completion.
Figure 4. The CMS WordPress page used for installing plug-ins from the directory 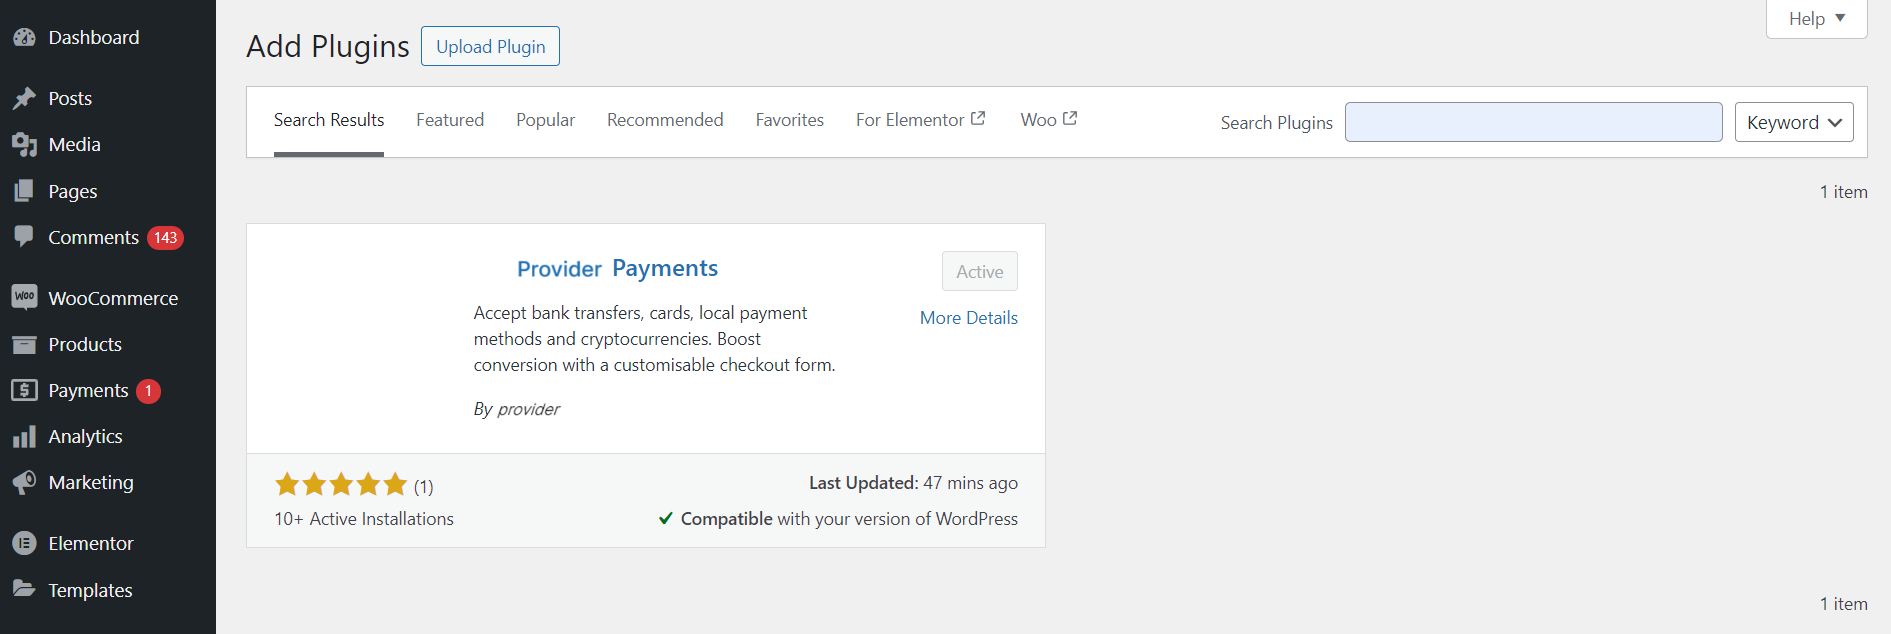
- Activate the plug-in using the Activate button, which is displayed instead of the Install now button (or instead of the Update Now button) after the installation.
- If the plug-in is being installed for the web service that is already in live mode and the previous version was enabled—check that the plug-in has not been automatically connected to the web service as a result of the activation (in order to ensure the plug-in is not available to customers before the parameters setup).
For this, proceed as follows: ensure that the Enable toggle switch is off.
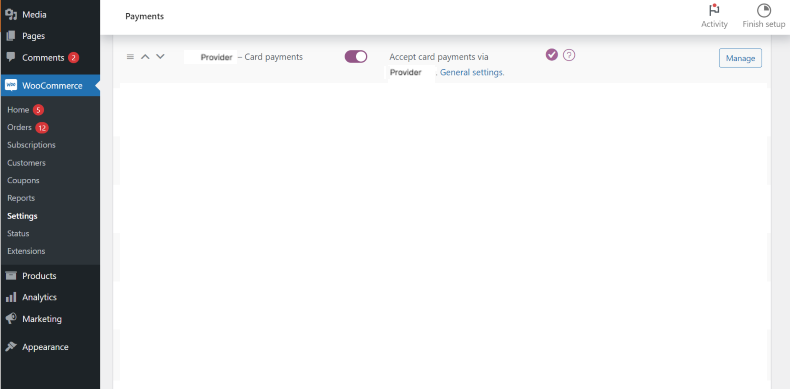
- Go to the Payments tab in the Settings subsection of the WooCommerce section.
- Find the card payments in the Method column and ensure that the Enable toggle switch is off.
Installation via the plug-ins upload function
To install the plug-in using the upload function, go to the WordPress interface and proceed as follows:
- Select the Plugins section in the navigation menu and the Add New Plugin item in the menu that appears.
- Click the Upload Plugin button on the page that opens.
Figure 5. The CMS WordPress page used for installing plug-ins via the upload function 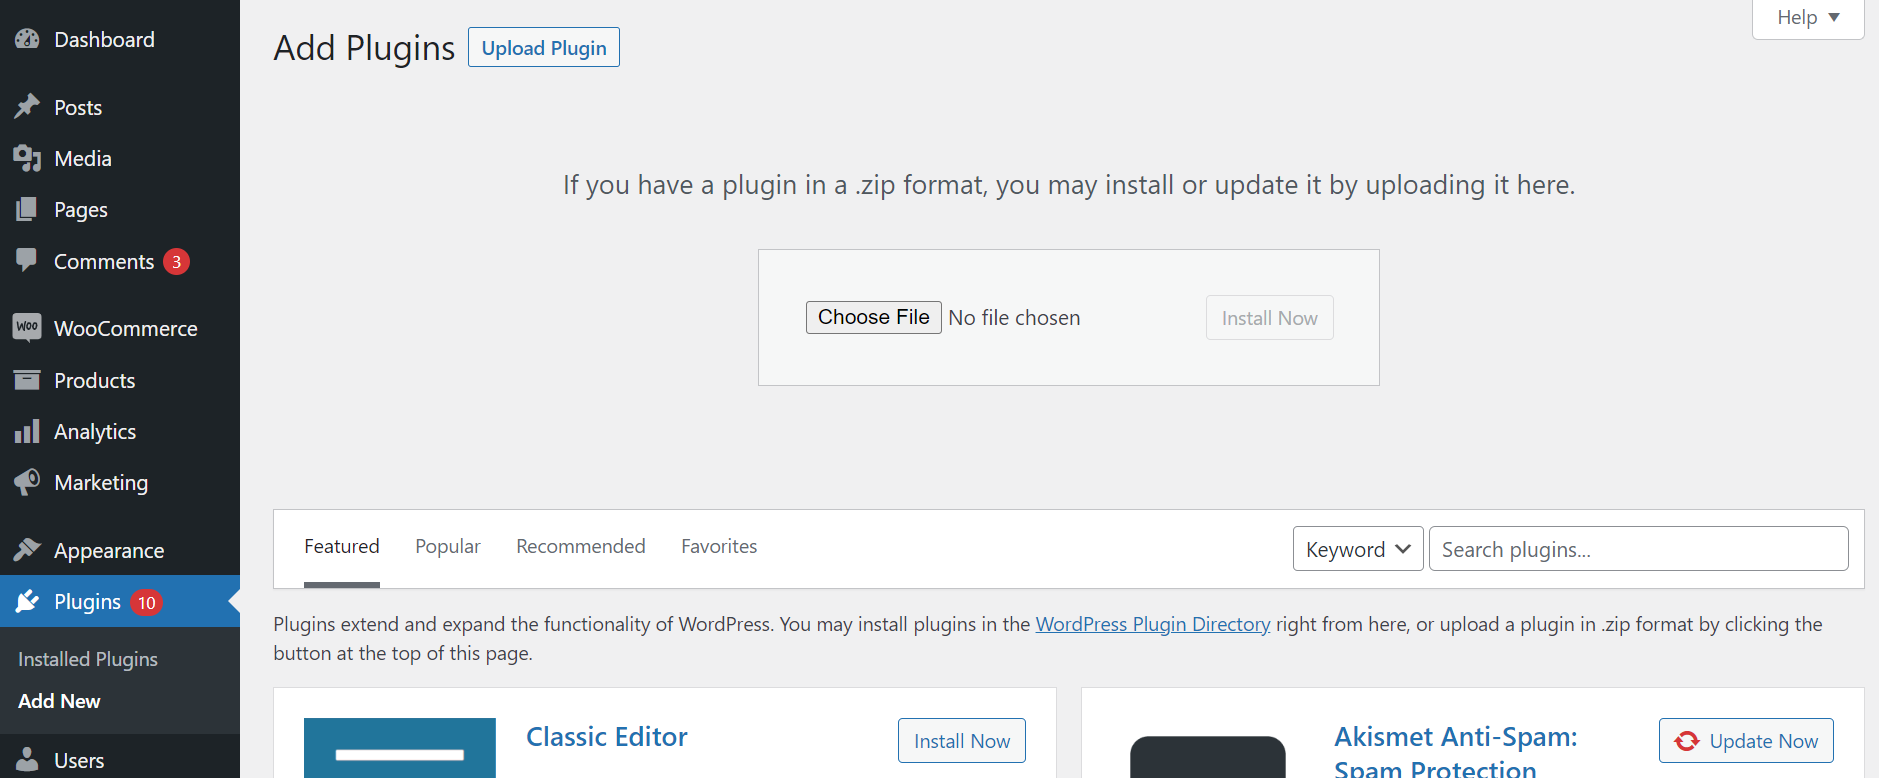
- Select the previously downloaded zip file of the plug-in.
- Click the Install Now button and wait for the installation completion.
- Click the Activate Plugin button for activation (if the plug-in has not been installed in the web service) or the Replace current with uploaded button for the version update (if the plug-in has already been installed).Note: After an attempt to update the plug-in, you may see a notification in the WordPress interface stating that the plug-in cannot be updated and find its both versions—the previous and new one—on the list of installed plug-ins. This can happen when the names of zip files with the previous and the new version are different. When this is the case, deactivate and delete the previous version and active the new one for the plug-in to operate correctly.
- If the plug-in is being installed for the web service that is already in live mode and the previous version was enabled—check that the plug-in has not been automatically connected to the web service as a result of the activation (in order to ensure the plug-in is not available to customers before the parameters setup).
For this, proceed as follows: ensure that the Enable toggle switch is off.
- Go to the Payments tab in the Settings subsection of the WooCommerce section.
- Find card payments in the Method column and ensure that the Enable toggle switch is off.
- If a notification about the needed parameters update is displayed in the WordPress interface—click the Run the updater button and wait for the update completion.
Testing
Overview
Testing the Flashpay Payments plug-in operation and various payment scenarios without actual debiting of funds is possible via the test environment of the Flashpay payment platform. You can connect to the platform by using the corresponding form on the company's main site and the identifier and key of the test project received from Flashpay. Along with that, it is necessary to provide the Flashpay technical support specialists with the name of the web service, for which the plug-in from Flashpay should be used, the web service URL, and the payment currency.
Keep in mind that, when using the test environment of the Flashpay payment platform, the plug-in is connected to the web service and becomes available to customers as the payment option. Thus, in cases when the plug-in is connected to a web service that operates in live mode, it is recommended to ensure that testing takes place during a low-load period and notify the customers about the ongoing testing activities.
Parameters setup
To prepare the plug-in for testing, proceed as follows:
- Open the plug-in tab in the WordPress interface.
For this, proceed as follows:
- Go to the Payments tab in the Settings subsection of the WooCommerce section.
- Find one of the payment methods set up for working with Flashpay in the Method column and click the General settings button in the corresponding line.
- Set up the basic parameters of the plug-in operation on the General tab:
- Project ID—the test project identifier.
- Secret Key—the test project key for interacting with the platform.
- Language—the language in which the payment form is displayed.
Figure 6. The General tab with basic parameters for setup 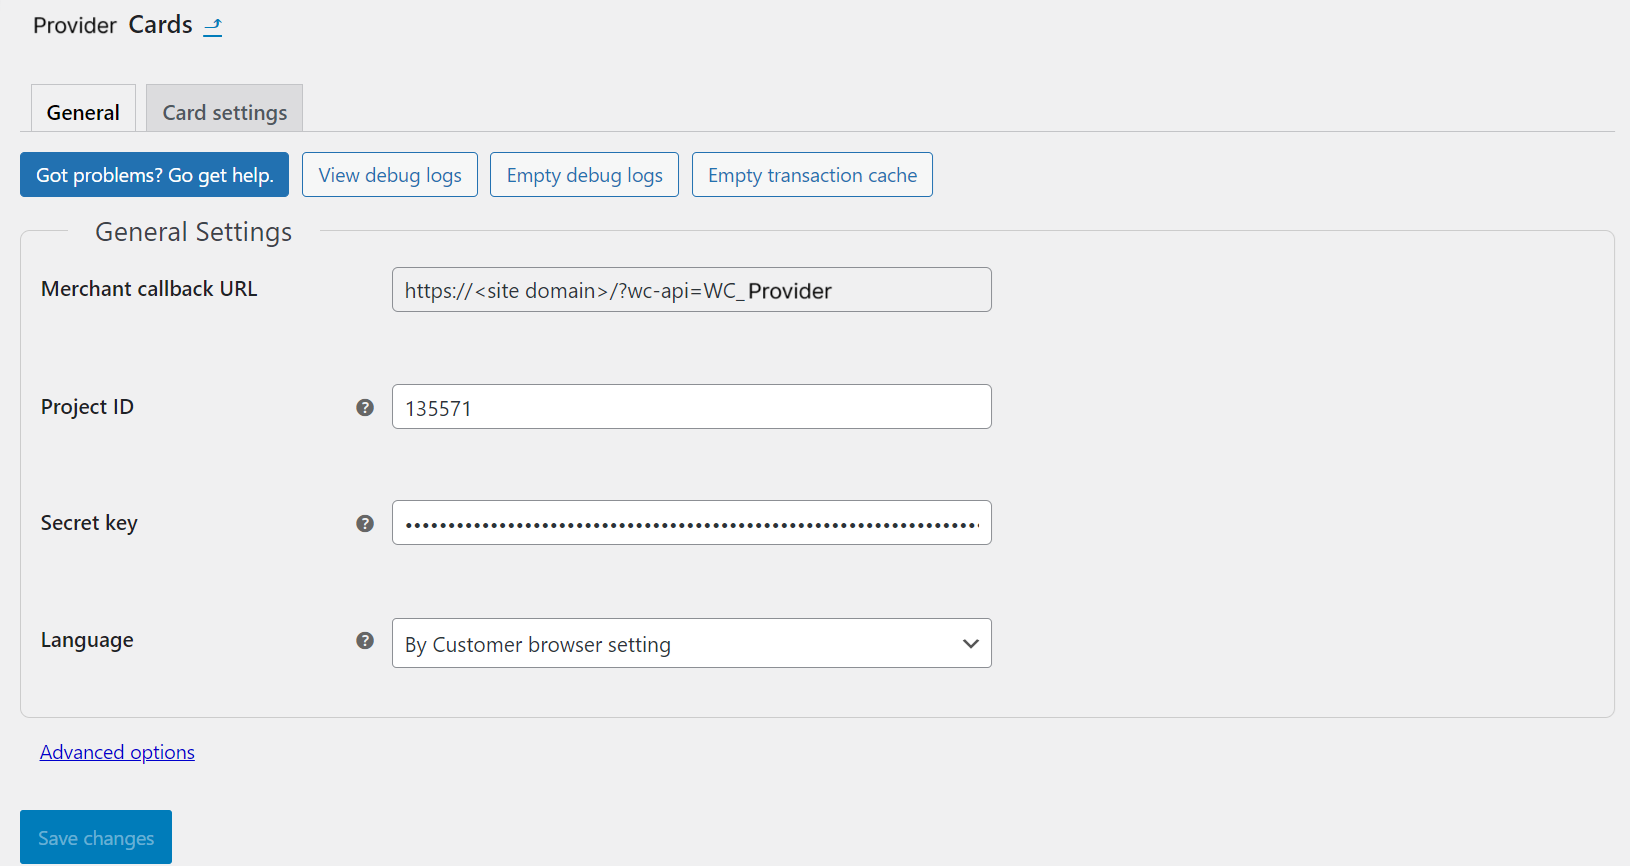
- If necessary, specify additional plug-in parameters.:
For this, click the Advanced settings link on the General tab and set up the parameters in the sections Transaction Cache and Shop Admin Setup:
- Enable Caching—the feature for caching payment data to optimise the plug-in operation in the web service.
- Cache Expiration—the duration of cached data storage in seconds.
- Log Level—the level of logging the plug-in operation.
The information about created logs is provided on the Logs tab in the Status subsection of the WooCommerce section.
- Fetch Payment Info—the feature for displaying payment statuses in the Orders section.
For the payment statuses to be displayed in the Orders section, select the Enable checkbox, otherwise, clear the checkbox. By default, the checkbox is selected.
- Complete order automatically—the feature for completing orders automatically when payments are processed.
For orders to be completed automatically when payments get the Success status, select the Enable checkbox, otherwise, clear the checkbox. By default, the checkbox is not selected.
Figure 7. The General tab with additional parameters for setup 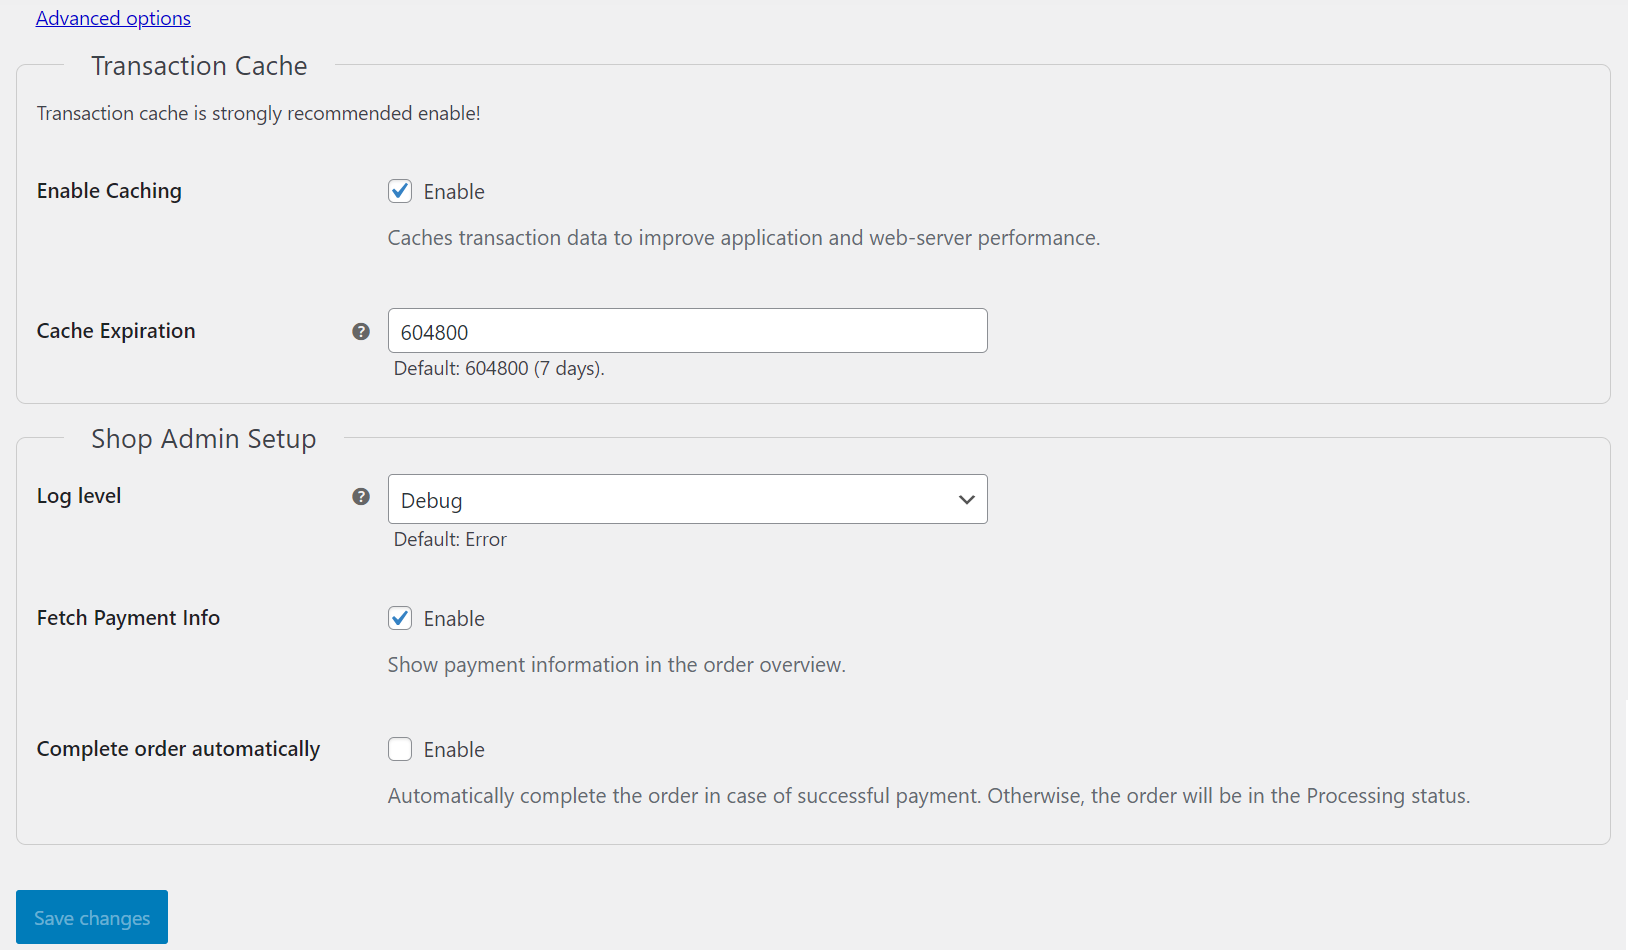
- Save the basic plug-in parameters.
For this, click the Save changes button.
Processing test purchases
When testing the plug-in operation, you can process test purchases in the web service and obtain information about them via the WordPress interface. in the Orders section. Along with that, you can use special payment credentials that allow testing particular payment scenarios.
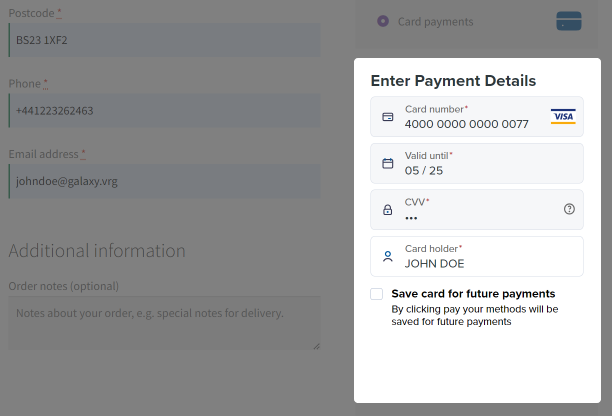
To test card payments, you can use the numbers of test cards. For testing according to the shortest scenarios (without the emulation of the 3‑D Secure authentication), the following numbers of cards can be used:
4000 0000 0000 0077—for a purchase to be processed4111 1111 1111 1111—for a purchase to be declined
For more comprehensive testing, it is possible to use extended test data for card payments (details). (including scenarios with the 3‑D Secure authentication) provided in the Test cards article.
Processing test refunds
Overview
After processing test purchases, you can make test refunds via the WordPress interface and, if relevant, via the Gate API and Dashboard from Flashpay. Along with that, keep in mind that refunds can be made in case if orders in the WordPress interface have the statuses Processing or Completed and if payments in the Flashpay payment platform have the statuses success, partially reversed, or partially refunded. Also, you can take into consideration that all information provided in this subsection is as well relevant for issuing refunds in the production environment.
Ensuring data synchronisation
When refunds are initiated via the interfaces of the Flashpay payment platform (Dashboard and the Gate API), payment and order information in the WordPress interface is updated only if conditions that trigger callbacks from the payment platform have been configured. Thus, if the merchant needs to issue refunds via the Flashpay platform interfaces and monitor the payment and order information via the WordPress interface, it is important to ensure that callbacks can be sent and received for automatic updates of information in the WordPress interface. For this, the following conditions must be met:
If the merchant needs to issue refunds via the Flashpay platform interfaces, it is important to ensure automatic updates of information in the WordPress interface. For this, the following conditions must be met:
- For the project in use, conditions that trigger callbacks sent from the payment platform to the WordPress CMS are configured (these callbacks should be sent to the URL specified in the Merchant callback URL field of the plug-in parameters in the format
https://<site domain>/?wc-api=WC_Flashpay).Information about working with conditions for sending callbacks is provided in a separate article.
- The configured conditions for sending callbacks do not have duplicates with the same payment type, event type, and payment method code.
Procedures
To make a refund via the WordPress interface, proceed as follows:
- Open the orders register.
For this, open the WooCommerce section and select the Orders item in the menu that appears.
- Select the order that should be refunded and click the Refund button in the order tab that opens.
- Specify the number of the items that should be returned (in this case, the refund amount is calculated automatically) or specify the refund amount without changing the number of items in the order.
- If necessary, specify the reason for the refund in the Reason for refund field.
- Confirm the refund.
For this, click the Refund via Flashpay button.
- Ensure that the order amount has changed by the refund amount and the right sidebar Order notes displays the notification about the performed operation.
In case of a partial refund, the order is assigned one of the statuses:
ProcessingorCompleted, while in case of a full refund, the order is assigned the statusRefunded.
To make a refund via the Gate API or Dashboard of the Flashpay platform, use the procedures provided in the corresponding articles: Purchase refunds (for the Gate API) and Issuing refunds (for the Dashboard interface).
Usage
Overview
In order to process payments with actual debiting of funds, you should initially solve all organisational issues related to the interaction with Flashpay (submit the application for connecting to the payment platform, provide all necessary information, and receive a notification from Flashpay about the possibility to process payments, as well as the identifier and secret key of the production project). Along with that, it is necessary to provide the Flashpay technical support specialists with the name and URL of the web service for which the Flashpay Payments plug-in is set up and the currency in which payments are to be processed.
After that, you specify the identifier and secret key of the production project received from Flashpay in the parameters of the plug-in operation and set up other necessary parameters. (or check whether the current setup is relevant for working in real-life conditions). If later you need to suspend the plug-in operation, the plug-in methods can be disabled. Besides, if additional testing is needed, for example when setting up new features, the plug-in can be switched to using the test environment.
Setup of the parameters for one-time purchases
To set up the plug-in for processing one-time purchases, proceed as follows:
- Open the plug-in tab in the WordPress interface.
For this, proceed as follows:
- Go to the Payments tab in the Settings subsection of the WooCommerce section.
- Find one of the payment methods set up for working with Flashpay in the Method column and click the General settings button in the corresponding line.
- Set up the basic parameters of the plug-in operation on the General tab:
- Demo mode—the feature for switching the plug-in operation mode.
For using the production environment of the platform, clear the Enable Demo mode checkbox and specify the parameters for connecting to the platform received from Flashpay in the fields Project ID and Secret Key.
- Project ID—the production project identifier.
- Secret Key—the production project key for interacting with the platform.
- Language—the language in which the payment form is displayed.
Figure 9. The General tab with basic parameters for setup
- Demo mode—the feature for switching the plug-in operation mode.
- If necessary, specify additional plug-in parameters.:
For this, click the Advanced settings link on the General tab and set up the parameters in the sections Transaction Cache and Shop Admin Setup:
- Enable Caching—the feature for caching payment data to optimise the plug-in operation in the web service.
- Cache Expiration—the duration of cached data storage in seconds.
- Log Level—the level of logging the plug-in operation.
The information about created logs is provided on the Logs tab in the Status subsection of the WooCommerce section.
- Fetch Payment Info—the feature for displaying payment statuses in the Orders section.
For the payment statuses to be displayed in the Orders section, select the Enable checkbox, otherwise, clear the checkbox. By default, the checkbox is selected.
- Complete order automatically—the feature for completing orders automatically when payments are processed.
For orders to be completed automatically when payments get the Success status, select the Enable checkbox, otherwise, clear the checkbox. By default, the checkbox is not selected.
Figure 10. The General tab with additional parameters for setup
- Save the basic plug-in parameters.
For this, click the Save changes button.
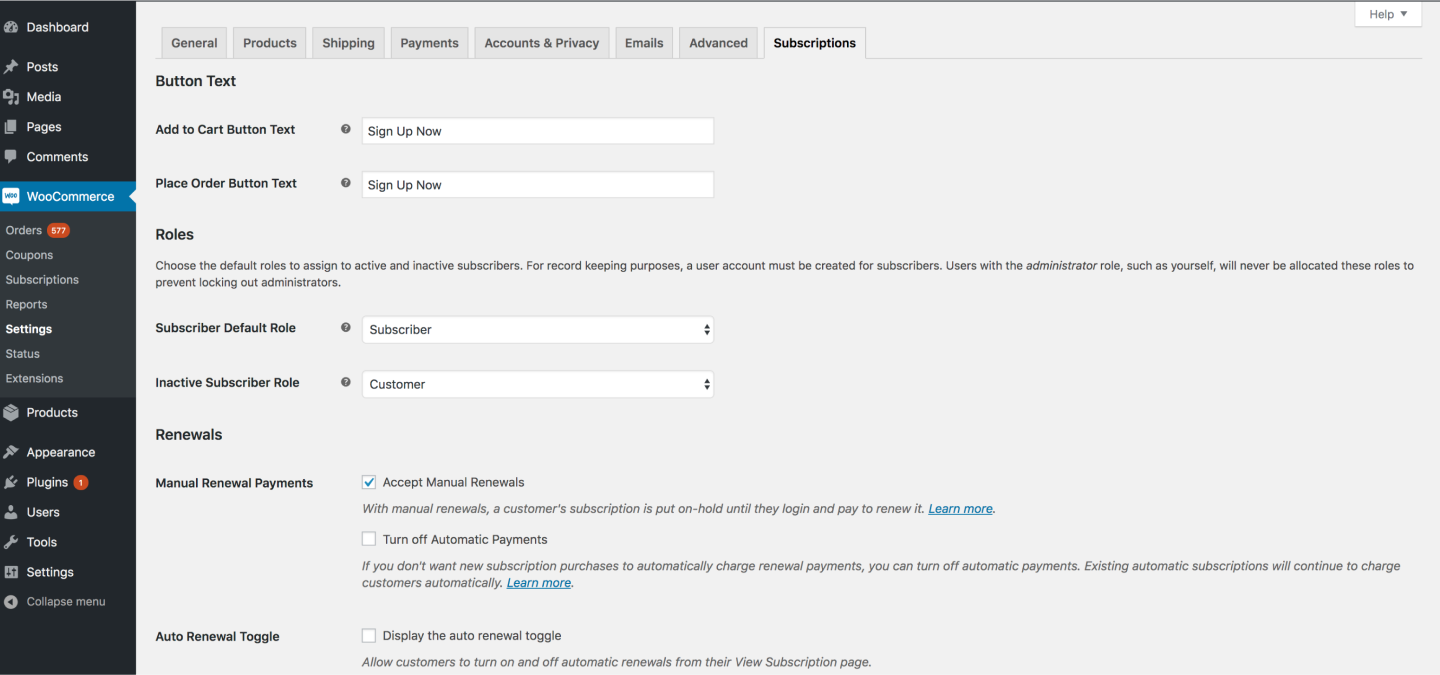
Setup of parameters for COF purchases
In order to set up registering and processing of COF purchases (subscriptions) with the use of the Flashpay Payments plug-in and the WooCommerce Subscriptions extension, you should set up the parameters of the Flashpay Payments plug-in (according to the setup instructions for one-time purchases) and use the tools available in the WooCommerce plug-in tab of the Subscriptions tab. On the Subscriptions tab, it is possible to set up different parameters, including the following ones: the names of the buttons, which are used for adding the products to the cart and paying for them, options of COF purchases renewal after their suspension, and other parameters. Information about working with COF purchases via the WooCommerce Subscriptions extension is provided in the WooCommerce documentation.
Processing purchases
If the web service and the plug-in have been set up correctly, purchases are processed automatically. Along with that, it is important to ensure that all necessary data is collected on the web service side.
In case of questions or issues related to purchase processing, contact the Flashpay technical support specialists.
Issuing refunds
Overview
After processing test purchases, you can make refunds via the WordPress interface and, if relevant, via the Gate API and Dashboard from Flashpay. Along with that, keep in mind that refunds can be made in case if orders in the WordPress interface have the statuses Processing or Completed and if payments in the Flashpay payment platform have the statuses success, partially reversed, or partially refunded. Also, you can take into consideration that all capabilities and procedures of working with refunds in the production environment correspond to those available in the test environment.
Ensuring data synchronisation
When refunds are initiated via the interfaces of the Flashpay payment platform (Dashboard and the Gate API), payment and order information in the WordPress interface is updated only if conditions that trigger callbacks from the payment platform have been configured. Thus, if the merchant needs to issue refunds via the Flashpay platform interfaces and monitor the payment and order information via the WordPress interface, it is important to ensure that callbacks can be sent and received for automatic updates of information in the WordPress interface. For this, the following conditions must be met:
If the merchant needs to issue refunds via the Flashpay platform interfaces, it is important to ensure automatic updates of information in the WordPress interface. For this, the following conditions must be met:
- For the project in use, conditions that trigger callbacks sent from the payment platform to the WordPress CMS are configured (these callbacks should be sent to the URL specified in the Merchant callback URL field of the plug-in parameters in the format
https://<site domain>/?wc-api=WC_Flashpay).Information about working with conditions for sending callbacks is provided in a separate article.
- The configured conditions for sending callbacks do not have duplicates with the same payment type, event type, and payment method code.
Procedures
To make a refund via the WordPress interface, proceed as follows:
- Open the orders register.
For this, open the WooCommerce section and select the Orders item in the menu that appears.
- Select the order that should be refunded and click the Refund button in the order tab that opens.
- Specify the number of the items that should be returned (in this case, the refund amount is calculated automatically) or specify the refund amount without changing the number of items in the order.
- If necessary, specify the reason for the refund in the Reason for refund field.
- Confirm the refund.
For this, click the Refund via Flashpay button.
- Ensure that the order amount has changed by the refund amount and the right sidebar Order notes displays the notification about the performed operation.
In case of a partial refund, the order is assigned one of the statuses:
ProcessingorCompleted, while in case of a full refund, the order is assigned the statusRefunded.
To make a refund via the Gate API or Dashboard of the Flashpay platform, use the procedures provided in the corresponding articles: Purchase refunds (for the Gate API) and Issuing refunds (for the Dashboard interface).
Monitoring payments and orders
The information about payments (including series of debits as part of COF purchases) processed with the use of the Flashpay Payments plug-in and about the corresponding orders can be monitored via the WordPress interface via the tools of the Orders subsection in the WooCommerce section.
Additionally, the payment information can be obtained via the Dashboard interface from Flashpay (details). This interface provides the information about payments and refunds processed via the Flashpay payment platform, but it does not display information about orders.
The Orders subsection contains an orders register with main details about every order and with the capabilities of searching and filtering data, as well as opening the tabs of separate orders and performing various actions related to the orders. (Alongside order statuses, the register can also contain payment statuses—if the Fetch Payment Info checkbox in the plug-in parameters is selected.)
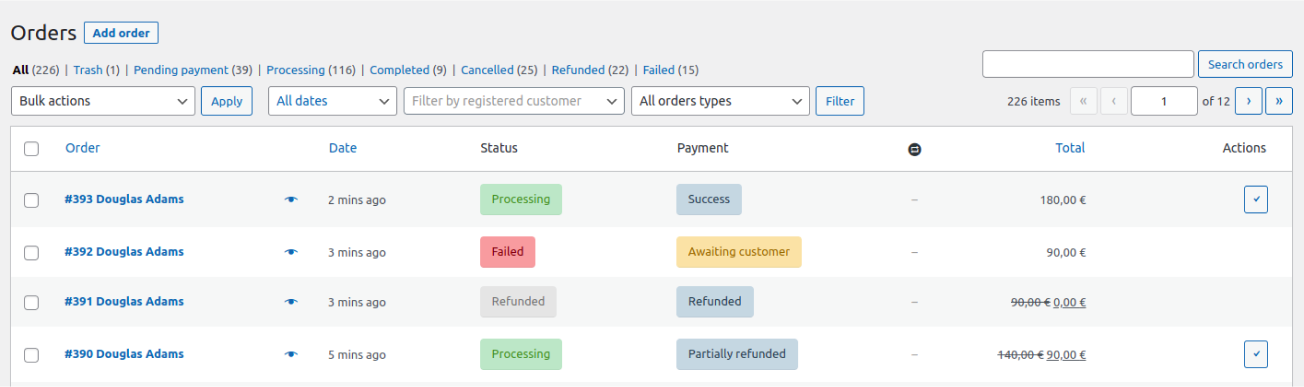
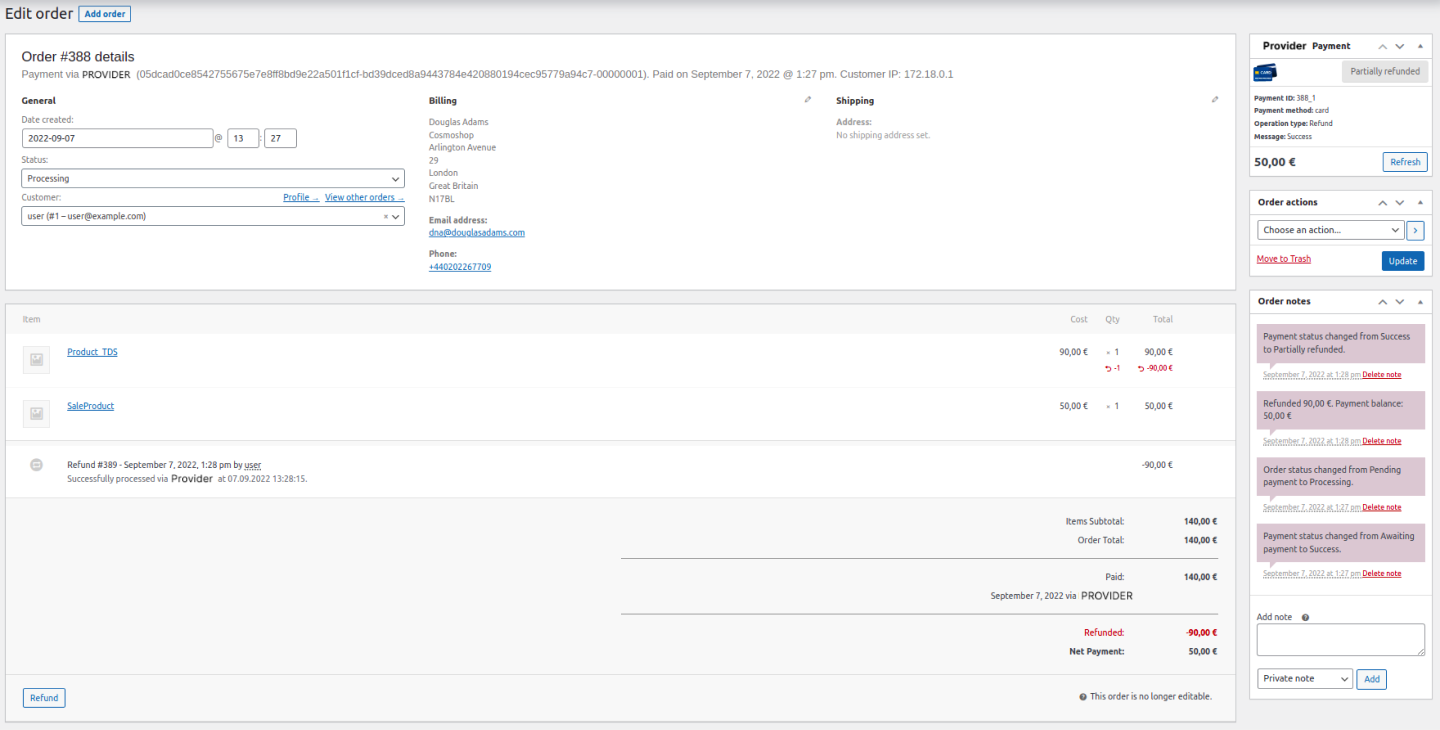
Clicking on an order's entry leads you to the order's tab containing the details about the order andTo open a tab of a particular order, click on the order's entry in the register. The tabs contain the details about orders and payments, such as the order creation date, the purchase amount, the payment option and status, delivery address, and other data. The tabs also contain the specialised panels:
- Flashpay Payment—with the payment information and the capability to update this information manually using the Refresh button.
- Order actions—with tools for performing various actions on the order.
- Order notes—with notifications about various events related to the order and the payment.

More detailed information about working with orders in the WordPress interface is provided in the WooCommerce documentation.
Monitoring COF purchases
With the WooCommerce Subscriptions extension, you have the access to the Subscriptions subsection in the WooCommerce section. This subsection contains the information about COF purchases (in addition to the information displayed in the Orders subsection). Similarly to the Orders subsection, the Subscriptions subsection displays the subscriptions register with main details about every subscription and provides the capabilities of searching and filtering data as well as opening the tabs of separate subscriptions and performing various actions related to the subscriptions.
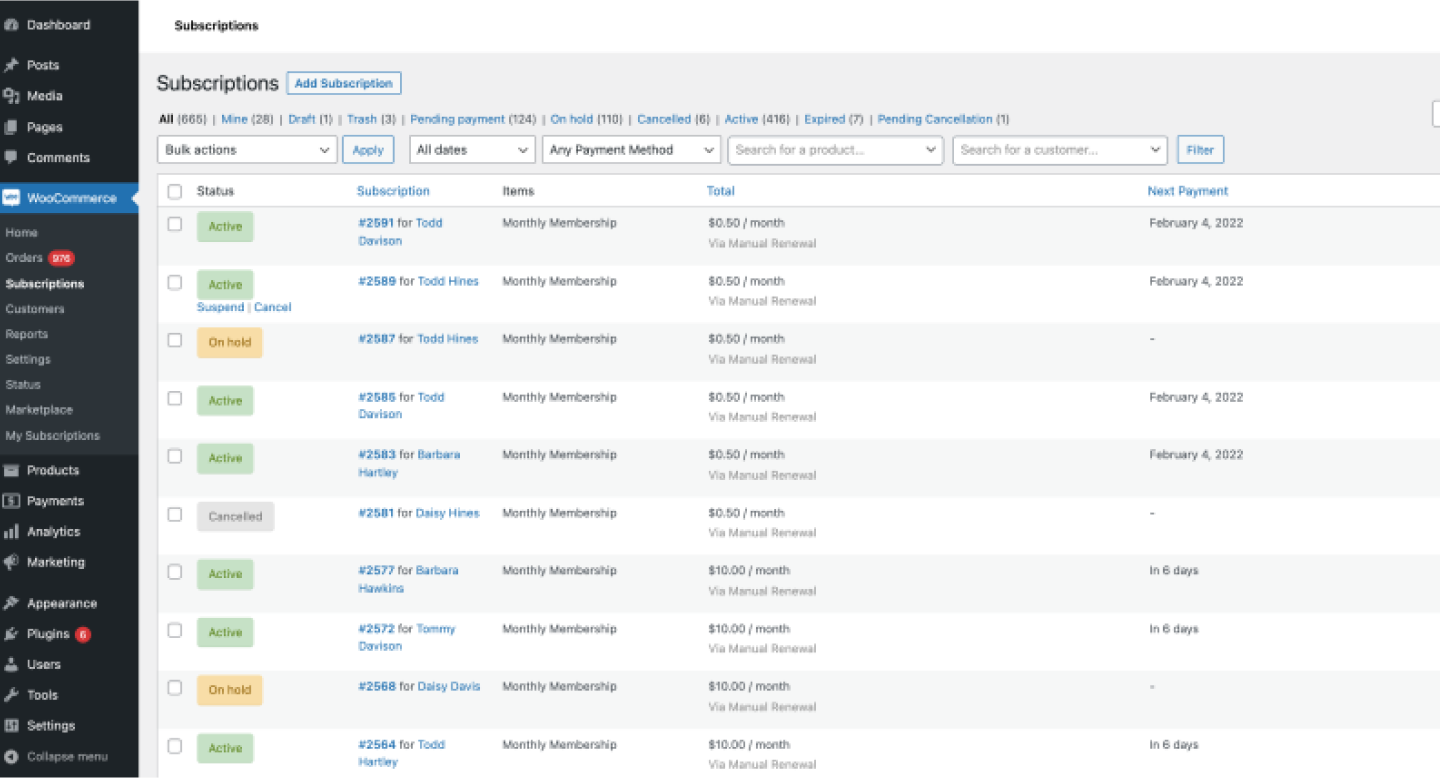
More detailed information about working with COF purchases in the WordPress interface is provided in the WooCommerce documentation.